
How to Light, Frame, and Capture Stunning Footage for Corporate Videos
Executive Summary:
Or: A load of reasons why it makes sense to hire professional videographers!
This section is essentially a long list of reasons why what might seem like a lot of money to hire a pro versus doing it yourself is not the case.
Making any form of video or film is a mixture of engineering and art. Let’s see why…
In corporate video production, visuals speak louder than words.(though as we will learn in another section, if the words arent recorded clearly enough, you may as well not bothe) Whether you’re filming an executive interview, a product demo, or a brand story, mastering lighting and framing is key to creating footage that looks polished and professional. This guide breaks down the essentials—even if you’re working with a lean setup.
Under exposed or badly lit video can really detract from the viewing experience, and therefore message of your film. A good lighting camera operator / DoP will be all over it, but it never hurts to at least understand some basic principles.
This learning zone guide looks at:
Okay, vamos, let’s go!
Step 1: Light for Clarity, Mood, and Brand Consistency
Use Three-Point Lighting:
If you get a quote from ACrew4U, there is a good chance that it will mention a “3 point lighting setup”. Sounds great, but what does the term actually mean?
According to Wikipedia:
“Three-point lighting is a standard method used in visual media such as theatre, video, film, still photography, computer-generated imagery and 3D computer graphics.[1] By using three separate positions, the photographer can illuminate the shot’s subject (such as a person) however desired, while also controlling (or eliminating) the shading and shadows produced by direct lighting.”
Okay, so it makes. We don’t want nasty shadows and want things to look good.
In order to achieve this we need the three lighting points alluded to in the name of this method.
They are :
- A Key light
- A fill light
- and backlighting
To create depth and eliminate harsh shadows. Here’s a diagram so you can see what I mean.

Here’s what it looked like on a shoot we did in France

You can see the three lights doing their job and if you look on the left hand side of the picture you can see the finished result in the monitor.
It’s super super important to have good lighting for greenscreen shoots because we need to get a good “key” so it doesnt look awful. Have a look at the below picture from another shoot in Paris.

We can see the person being filmed with a light behind and two offset to the sides so we have good, consistent and balanced light.
Here are some other things to bear in mind:
Match Your Brand Tone:
Use soft lighting for warmth and approachability; high contrast for bold, dramatic messaging. If you want to see this in action, why don’t you contrast an interview with a VIP or celebrity versus a piece to camera from a real crime type show.
Light Colour Temperature and frequency:
Light has lots of different colour “temperatures”, expressed in a measurement called Kelvin. Put simply, this is why some lighting looks warm (more red/yellowish) and some cold (more blue-ish).
Here is a diagram that shows the various colour temperatures of different light sources. (image source: https://www.downlights.co.uk/faq-which-colour-temperature-.html)
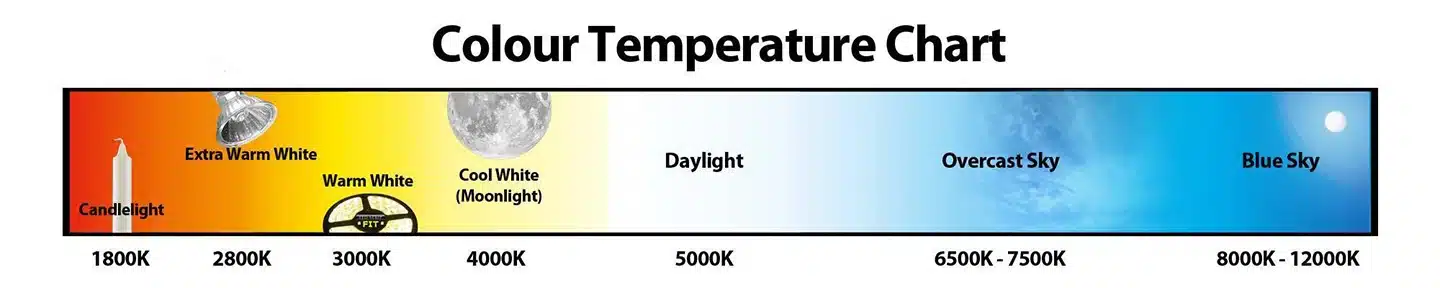
Candlelight has a temperature of 2000 Kelvin and a clear blue sky has one of 10000 Kelvin.
This excellent, wikipedia article explains it all in depth. It’s a very important area to understand https://en.wikipedia.org/wiki/Color_temperature
Why mixed light sources need to be controlled
In the same way that walking into a dark room after being outside on a sunny day messes with your eyes, a camera doesn’t handle mixed light sources too well as it has trouble working out the white balance, which means stuff looks wrong.
Shooting in a room with sun coming in and warm and cold light sources is a nightmare to shoot so you need to control light in a location.
Typically this would involve blocking light from a window, and using “flags” and other things to block light from troublesome sources.
This is where a good videographer / DoP is worth their weight in gold. What looks good to the naked eye can often be anything but to the camera.
White Balance
The light temperature will mean that the camera needs to have its white balance setup so what we see as “white” will match what the camera captures as such. This is called setting the white balance.
Implications on the shooting location
So, if you’re on a briefing call and the ACrew4U team starts asking loads of questions about whether the room has drapes or blinds, it’s not a decor related question!
Light frequency, frame rate and the curse of strobing / flickering
This is one that can catch you out, and ruin the look of your film.
Artificial lighting, when mains powered, is subject to the frequency of the alternating current prevalent or indeed the light source. It can occur that something like LED / fluorescent lighting can refresh at a rate that conflicts with the frame rate of video being shot.
If you overlook this, you end up with an ugly effect called “strobing”, it’s easy to miss on the shoot day but, I assure you you will notice it in post production.
Read this excellent guide from RED cameras for a strobing 101 https://www.red.com/red-101/flicker-free-video-tutorial
All the above is why you always need plenty of time to setup.
So if you ever wonder why the crew need 2 hours to load in and get setup, it’s because they need to attend to all this stuff.
Step 2: Compose and Frame Your Shots Like a Storyteller
The videographer’s job is far from done. Once we have finally got out lighting OK, we need to make sure the pictures captured are up to spec.
This is the “art” bit. It’s the reason why a photo taken by you or I doesn’t hold a candle to a picture by a great photographer.
Mathematicians studied what makes for perfect proportion and there is a so called “golden ratio” that explains why some stuff just looks “right”.
This stuff is super important. So, if you’re serious, read more here https://en.wikipedia.org/wiki/Photographic_composition
The basics that you need to bear in mind are:
Following the Rule of Thirds.
People have been studying this stuff for millenia. It’s the reason why some buildings and pictures are classics. It might mean you have to position subjects off-center for visual interest for instance.
Have a look at this image to see what I mean. The picture on the left is less interesting than the one on the right. (Image source: https://en.wikipedia.org/wiki/Rule_of_thirds#/media/File:RuleOfThirds-SideBySide.gif )

Mind the Headroom and Eye Line:
Keep eyes level with the camera and avoid too much space above the head.
Use Depth:
Include foreground and background elements to add dimension.
Step 3: Choose Locations That Enhance Your Message
Here are five things to bear in mind when selecting a location for your shoot:
- Background Matters: Clean, branded, and relevant to your message.
- Natural Light Can Be a Bonus: But control it with reflectors or blackout curtains.
- Beware immovable furniture: that big meeting room might seem ideal, but can you move the big table ? If not, there is a good chance that it will be problematic in case the area is needed for the shoot
- Avoid Visual Clutter: Distracting elements pull focus from your subject.
- Think about audio too: Can you switch the AC off? Is there a lift/elevator or busy area outside
Step 4: Use the Right Gear for the Job
This is where hiring a pro can be a godsend. Even at the basic level, you need a lot of equipment to shoot good video.
Let’s have a quick look:
Camera:
Most professional cameras today are amazing, from a basic stills/photo DSLR camera to a “proper” dedicated video camera. You can generally shoot 1080 HD , UHD 4K and above at all frame rates needed.
NB – if you’re shooting with more than one camera it’s suggested you stick to the same make or cameras that can achieve a consistent “look”.
Worth asking your editor what Colour space they want as well.
Lenses:
Unless you’re using some seriously out of date kit you should be able to change lenses according to the assignment.
Generally you’d employ wide for room shots, fixed focal length lenses (primes) often give the best result but are not as flexible as a good zoom ( telephoto) lens when you don’t know what an interview or B roll shoot will throw at you.
A good pro will know what they need.
Stabilization:
From the level of Lenses to Tripods, gimbals, or handheld rigs you have many ways to prevent shaky footage at the shooting stage.
Step 5: Capture B-Roll to Elevate Your Edit
In other sections we looked at making sure you have a good shotlist so I shall not elaborate here, but be sure to:
- Shoot lots of Supporting Footage: Office scenes, product close-ups, team interactions.
- Use Movement: Slow pans, tilts, and zooms add energy.
- Think Like an Editor: Get multiple angles and cutaways to smooth transitions.
Conclusion & Further Reading
Visuals Are Your First Impression
Lighting and framing aren’t just technical choices—they’re storytelling tools. With thoughtful setup and attention to detail, your corporate video will look as sharp as your brand deserves.
It’s well worth getting a professional in to help. They will have the theoretical knowledge and practical experience of making stuff look good and coherent, and the technical know-how to choose the right kit and prevent and overcome typical problems on-set.
Want to know more about Videography or ACrew4U?
Want to learn more about Video Crew?
- How to Plan Corporate Videography That Delivers Your Brand Message
- How to Direct a Corporate Video Shoot
- How to Light, Frame, and Capture Stunning Footage
- How to Record Crystal-Clear Audio for Corporate Videos
- How to Maximize ROI from Your Corporate Video
Find even more resources at our Video Crew and Videography Learning Zone